Saturday, December 8, 2012

Homemade Granola and Granola Bites

Granola Bites


I like Granola, but I'm pretty particular about what's in it.  I don't like raisins in it but I do like pecans.  I also don't like those little puffed rice thingys that are in some granolas.  It's really hard to find a store-bought granola that I like that's priced well.  After much research and experimentation I found a basic recipe that I like.  Each time I make it I add different "extras" depending on what I have on hand.

The original recipe I found came from Hillbilly Housewife.  It's called Honey Granola. You can read her recipe here.  She has tons of other recipes too, including recipes using your homemade granola. 

I noticed when looking at the ingredients in the storebought granolas I like that they use Brown Rice Syrup, so I ordered some from Country Life Natural Foods.  I used it in my granola today and replaced most of the honey called for with the brown rice syrup. 

I also replaced the butter with Coconut Oil in my recipe today.  This is the first time I've ever bought it and have been using it in various recipes.  It's expensive, but supposedly healthier than other fats. 

So here is the recipe for the Granola I made today:

My Homemade Granola

3 Cups dry Oatmeal (I use quick)
1/2 Cup Coconut Oil
1/2 Cup Brown Rice Syrup
2 tsp. Vanilla
1/2 tsp. Maple Flavoring
1/4 tsp. sea salt
1 tsp. cinnamon
1/2 Cup Pecans
1/2 cup sunflower seeds (raw)

Measured the coconut oil in a glass measuring cup and melt in the microwave.  Add the brown rice syrup and flavorings to oil and mix well.  In a large bowl, combine dry ingredients then add the liquids; mix well.  Pour out onto a baking sheet (I use a large stoneware pan).  Cook at 350 deg. for about 15-20 minutes.  Remove from oven, allow to cool.

I noticed that the granola seemed to clump together more so with the brown rice syrup than it does with the honey, which I like.  It turned out delicious.

I usually put flax seeds in my granola, but somehow managed to forget it this time, even though it was sitting right on the counter.

I like to eat granola on top of plain Greek Yogurt.  It's one of my favorite breakfast foods.

I also like Granola Bars.  If you read the ingredient list on most of them, there's all kinds of stuff you can't pronounce and tons of sugar.  I like a chewy granola bar.  Stephanie found this recipe for No Bake Energy Bites which is very much like a chewy granola bar, but in a smaller bite size version (Since I found this recipe I see that they've added lots more combinations to the website!).  The basic recipe on that site uses ingredients that most people have on hand.  I tweaked it to utilize what I like and I like my recipe a lot.  Even my husband, who is wary of "natural" (i.e., "tree bark") likes these for a quick snack.  The original recipe calls for peanut butter.  I've made them with peanut butter and I like them, but I have a lot of sunflower seeds, so I use those instead.  Here's the recipe I made today:

Granola Bites

1/2 cup toasted sunflower seeds*
1/2 cup toasted flax seeds

Process the toasted seeds in a food process until a fine meal forms. 

Combine seed meal with:

1 cup dry oatmeal
1/2 cup mini-carob chips*
2/3 cup Dried Cranberries*
1/3 Cup Brown Rice Syrup*
1 tsp. vanilla

* ingredients are from Country Life Natural Foods

Mix well.  Use a small scoop/melon baller to form balls.  Makes about 30 1" balls.  That sounds like a lot, but they go pretty quick - they're really good!

I mixed my ground seeds while they were still pretty hot from the toasting process so my carob chips melted, which I actually like a lot.  This way, the carob flavor is mixed throughout.

I've made variations of this recipe many times, changing it up depending on what I have on hand.  As long as you keep the wet/dry ratios about the same, you can use whatever you want.

If you make Granola Bites right after making Homemade Granola, you can just use the same bowl and utensils.  No need to dirty up anything else.  Plus they have a lot of ingredients in common, so it's all out on the counter anyway.

I could have toasted my seeds in my stoneware pan in the oven, but I'm notorious for leaving stuff on/in the stove and getting involved in other things and burning stuff.  So I like to toast nuts in the popcorn cooker.  It constantly stirs them so there are no scorched spots.

Homemade Granola Toasting in the Oven


Toasting Seeds


Saturday, December 1, 2012

My Charm Square Twirly Skirt Pattern - Coming Soon!

Journey in her Charm Square Twirly Skirt

I do love Charm Squares!  I like the fact that I don't have to measure, cut or coordinate prints/colors.  I like the fact that I can get one or more cuts of each fabric in a collection without having to hunt it down, buy it separately and cut it myself.  Charm Squares are the perfect size for so many things, like table runners.  They go together so quickly.  I made a cute table runner for Liz last Christmas out of charm squares, with red sashing in between the rows of squares.  It was super fast and easy.  One pack had enough squares for two large or four small (like the one I made for Liz) table runners.

I found an adorable collection of Charm Squares called Wee Woodland by Moda that features cute woodland animals, flowers and alphabets in contemporary fall colors.  I bought two sets for about $9 each.  I knew I would make Journey something for fall out of them when I first saw them. 

In addition to being in love with Charm Squares I am in love with Patchwork.  [Throwback to the 70's perhaps??  No doubt.]  Last Easter I made a peasant style dress for Journey that had a patchwork skirt.  I had to hunt for the fabrics that coordinated, and cut, piece, etc.  A lot of work!  Charm Squares, while a little on the expensive side, are the answer.

For a fall outfit I knew I wanted to make a "twirly" skirt out of this Woodland collection.  I searched the world wide web but could not find a twirly skirt pattern that utilized charm squares.  What to do?  Create it myself.  I figured if I wanted such a pattern, there was bound to be someone else out there who also wanted it, so I created a pattern for it.


My Charm Square Twirly Skirt Pattern is a tiered skirt utilizing precut charm squares which are pieced together.  In addition to the skirt pattern I am including a pattern and instructions for creating a coordinating "bib" embellishment on a purchased t-shirt. 

I will have the pattern ready after Christmas.  Now, who is interested in testing it out for me??

Twirl Journey!


Tuesday, November 20, 2012

Woo-Hoo! My First Pattern is Finished!


Over a year ago I designed a Clothespin Bag because I couldn't find one in stores and I really enjoyed line drying my laundry.  I did find a pattern, but it was way too expensive for my tastes.  I thought about what would work best for me and designed my Clothespin Bag.  I decided I would make one for sisters Dana and Mary since they line dry laundry occasionally as well.  I used some fabric given to me by my friend Mary as she was de-stashing.  It was  a heavy blue and white plaid twill.  I used red foldover braid to encase the raw edges.  They turned out really nice. 

I knew that if I had found a need, others probably had as well.  So I decided to write up a pattern for my Clothespin Bag. 

My sister Kathy tested it out for me and will be posting pictures on her blog soon.

I have listed it for sale HERE on Etsy.  It's a PDF file which can be printed at home.  I LOVE paper patterns, but I'm not planning to go into the business of printing patterns, that's for sure.  There are some other patterns on Etsy, but in my opinion are just too expensive.  I mean you're line drying your laundry to save money right?

Here's a pic of two of the finished items I made up to take pics while I prepared the pattern:


The red one is made from a vintage tablecloth, with the foldover red braid and (hard to see in this pic) red gingham lining.  The other is pink twill (again donated by my friend Mary)  and features Ric Rac trim and an applique made from a vintage embroidered pillowcase. 


The name Caroline's Cottage is a company name I came up with about 13 years ago.  I wanted something homey sounding and Caroline is my middle daughter's name.  I made and sold candles back then.  Unfortunately the name is not available on Etsy (I'm a relative newcomer to the Etsy scene).

I have another pattern in the works which I will finish sometime after the holidays.  It's a children's skirt and top, which unbelievably I searched for on the internet to buy, and couldn't find so I had to design it myself.  Stay tuned for that one - I'll need test sewers for that one too!

Friday, November 9, 2012

Tips for Embroidering or Appliqueing on Knit T-Shirts


Finished T-Shirt
One of the best sites for general embroidery designs and tutorials on how to do just about everything there is to do on an embroidery machine is emblibrary.com.  I've done a lot of embroidery and applique on t-shirts, which can be tricky, but still make mistakes and need to go back to the basics.  Most of the time any problems I encounter are due to operator error. 

I always make sure to prewash and dry the t-shirt and any applique fabrics and then press.  Never use fabric softener because this can interfere with some fusibles. 

Selection of stabilizer is very important.  I like Floriani no-show mesh stabilizer for t-shirts.  It is fusible which I really like.  It's a cut-away type so whatever you don't trim away stays in place.  This is important because it will continue to stabilize the fabric/applique during wear and laundering.  After I fuse on that stabilizer, I add either a fusible tear away or I'll use a wash-away sticky stabilizer.  I choose the fusible tear away if the shirt is a larger size or if I'm only stitching on a portion of a shirt (in a smaller hoop).  If I'm working on a onesie or small t-shirt I use the sticky stabilizer, press the shirt in place and pin outside of the stitching area.  It's just too hard to try to hoop a small item. 

I also use wash-away film type stabilizer as a topper when satin stitching (not during the applique process).

Some of the stabilizers I use
After I launder the applique fabrics, I press well and then apply a fusible webbing.  I like Heat N Bond Lite.  It fuses well but does not gunk up the needle.  Steam-a-Seam  - even their "lite" products - will gunk up the needle - it does not work for me at all.  It's great for fusing things but don't use it in machine embroidery! Take my word for it.  Some designs have so much stitching that a fusible webbing may not be necessary but I think it's a good idea to use this in children's clothing.

Heat N Bond Lite
After pressing the t-shirt I mark the placement of the design with a wash away marker.  I find the center of the neckline and mark to the bottom of the shirt and make another line from one underarm seam to the other.  Then I hoop the shirt, making sure it's all lined up.


My large embroidery hoop is a little on the loose side, which is one of the reasons I use two layers of stabilizer (the mesh and the tear away).  I also like to use a screwdriver to tighten it up after hand tightening.  Maybe one day I'll splurge and get a Snap Hoop and elminate all this work. 


For a large t-shirt, I pull the back up and over the top of the hoop.  There's really no easy way to pin the excess fabric out of the way during stitching, so I just move it around as I go.  I could use sticky stabilizer on the larger t-shirts, but the shirt will be more stable if it's hooped.


 This picture shows a portion of the applique, just after it's been tacked down. 


After this tack down, I remove the hoop from the machine and cut away the excess fabric.  This is where the fusible webbing comes in. I use my Clover mini-iron to set the fusible webbing in place. By doing it at this step I avoid over-pressing the satin stitches.

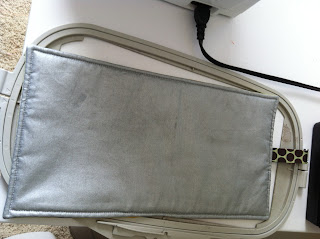
In order to press in the hoop I made a pressing pad that fits the stitch area of my largest hoop.  I used ironing board fabric (teflon coated I think) on the pressing side and a quilting fabric on the other side.  In between is Insul-Brite fleece.  It's basically like a large potholder.  I added a coordinating ribbon tab so that I can hang the pad near my machine.  I can slip the pad under the hoop while it's still on the machine and press.  This saves a lot of time.


Tuesday, November 6, 2012

Fall Themed Monogrammed Kitchen Towel

I had this really cute applique design from Applique Planet, (which primarily sells applique designs geared towards children) and after making a t-shirt for Rylan with this same design I decided I needed one for my kitchen.  Their appliques are really detailed and stitch out perfectly.  I especially love the heavy top stitching on top of the satin stitch. 

Due to the extra applique fabric, embroidery thread and stabilizers, the embroidered side of the towel is heavier than the other, which can cause it to slip off of towel racks, which is extremely annoying in the kitchen.  To prevent this, I now add weight to the other side of the towel by adding a little extra fabric or interfacing to the band at the lower edge.  It's tucked into the wrong side of the band so it doesn't show but it serves to balance out the weight.

These pictures were taken after I'd used the towel and washed and dried it.  I didn't use fusible webbing on the applique fabric and even though I prewashed all fabrics, you can see that it still puckered a little after laundering.

Saturday, November 3, 2012

I survived the International Quilt Festival

My friend Beth goes to the International Quilt Festival every year with the local quilt shop group.  She'd told me how much she enjoyed it, but I never went cause I'm really not "into" quilts.  Last year she told me about all the STUFF (patterns, fabric, etc.) she bought and of course that got me interested.  So I decided to go this year.

The local quilt store, Lonestar Quiltworks, puts together a trip each year.  They provide chartered buses (two this year, which were completely full) which leave the parking lot around 8:00 a.m.  The Shop owner and her employees go along and provide a "goodie" bag, light breakfast, snacks, drinks, and a boxed meal at the end of the day. It was nice not having to drive, fight the Houston traffic, then find and pay for a parking space and schlep all our stuff back to the vehicle at the end of the long day. We were able to get out right at the door. In the goodie bag was our wrist band, which was our ticket. So we didn't have to wait in any lines either.

I have a tendency to be late (surprised?) so since Beth was picking me up, I had everything I could possibly need laid out the night before.  I was dressed and ready to go a little early.  Beth was early as well (funny how we can't get to work on time but we can leave for something like a quilt festival early!).  We stopped for coffee and got to the bus by 7:15.  We got some really good seats.  I sat down, got comfortable, got my phone out to check emails and such and exclaimed "OMG - I forgot my glasses!!".  It was too late to run back and get them.  I think getting out of the house early threw me completely off.

When I got to the festival, the very first booth had "cheater" reading glasses, which I promptly purchased.  They're the same glasses I got in the Target dollar bins, only I paid $23 for these....  Taking them off (to walk) and putting them on when I wanted to read something got old fast and made me dizzy so I was a tad queasy all afternoon. 

The plan of attack was to visit the vendor section first, then go view the quilts.  This worked great for me, cause I really didn't want to look at the quilts.  From 9:00 a.m. till about 1 we went up and down the vendor aisles, shopping.  I spent all the cash I brought on aisle TWO.  Every vendor had the Square payment processors which made it convenient to continue shopping . . .

We walked about 10 miles to the lunch area and and had a show and tell of our purchases thus far.  At this point I was getting tired.  We'd walked for about 4 hours straight.  But we pushed on.  The picture above shows us heading back to the vendor area.  At the very top of this picture you see a sign that says "1900".  This indicates the aisle number. I think we'd already passed some aisles when I snapped this pic. This is aisle 19!!!  You can see that the signs go practically as far as the eye can see.  After the vendor aisles there are the quilts on display, they're numbered A-whatever.  These aisles are HUGE and feature vendor after vendor.  I simply didn't have time to see them all.  We left at 6:00 p.m.  I could have spent two days easily in the vendor area.

Some of my favorite booths included one called 8th State, from South Carolina.  I didn't get a pic, but their booth was full of vintage buttons and trims.  Everything was displayed so imaginatively too - like vintage buttons on vintage BINGO cards!  And little bitty scraps of trim wound around wooden thread spools.  I do love Ric Rac so of course I gravitated to that area.   I found some Ric Rac the color of Butternut Squash, which I have NEVER seen before.  I was prepared to buy up a bunch of it when I noticed the price - $4.50 per yard!!  I just bought one yard.  It will be just enough to embellish a table runner.  She said it was from the 1960's.  Some of the Ric Rac was on metal spools.  This probably came from some dress maker shop or factory. 

Another absolutely adorable booth was Just 4 Fun, in which I purchased more Ric Rac.  They had a cute "tree" on which they had their Jumbo Ric Rac displayed, which immediately caught my eye.  They had an unusual aqua color, which matched another purchase, so I bought 5 yards.  It will embellish Journey and Willow's Christmas Dresses (more about that later).

Another cute booth which caught my eye was Lollipops.  They make bindings out of cute prints and have them wound up on a stick like lollipops.  They have lots of other stuff too.  There was a beautiful quilt on display, but I didn't get a picture of it.  It featured machine embroidered redwork in white blocks.  The redwork was vintage-y looking Christmas schenes.  The quilt featured Moda "Blitzen" fabrics.  I have been looking for a red/aqua combination and this was it!  I bought a jelly roll.  I will be making Christmas Dresses for Journey and Willow and maybe a table runner or other project out of this, along with some coordinating yardage.

Another cute booth was Sew It Up.  I've seen their ads in Sew Beautiful Magazine, but had never looked at their website.  There was SO much to see in their booth, I was overwhelmed!  The ladies who were working were so helpful and had some great tips and ideas.  I bought a really cool ruffle knit to make some leggings (not for me of course!).


One cute idea was a pair of jeans that they'd cut off the legs to make shorts, then put some of this ruffle fabric around the raw edges, then sewed a wider strip of the ruffle fabric on top of the shorts to make a tiered skirt effect.  It was cute, and a good idea, since little girls would still have on shorts but it looks like a skirt.  Their booth had tons of patterns, fabrics, trims, etc., as well as lots of finished items for ideas.  Here's a look:


Another booth I liked was Violette Field Threads


They have some patterns I'd looked at online already.  One of those, the Emmeline halter dress (shown below), was on my to-do list for Journey.  I already have a multi-color chevron out of which I plan to make it.  They didn't have all their patterns for sale, I think because a lot of them are e-patterns only.  But I was able to get a price break when I bought three, which was nice. 


At 6 we boarded the bus and stopped a little later for our box lunch.  We got home at 9:00 p.m. (Beth 30 minutes after that cause she had to drive home).  I wish I could have spent more time in some of the booths!  There was just too much to see in one day.  There were sewing machine manufacturers with every model they offer, but I didn't have time to even look.  There were scads of booths full of all manner of sewing gadgetry but I simply didn't have time!  Next year . . .

Saturday, October 20, 2012

Easy & Egg Free Pudding Recipes

Occasionally I have looked at the grocery store for the packaged butterscotch pudding mix that you have to cook.  I haven't been able to find it.  I do find the instant puddings, which I don't like.  I guess demand has just dwindled to the point that they no longer make it, perhaps due to the convenience of prepared puddings in cups.

I LOVE butterscotch pudding.  Chocolate comes in third, after tapioca.  What's strange though is that I like pudding HOT.  Once it's cold I don't like it.  I think I get this from my Dad.  He used to have his pudding, hot or warm, with cream on top.  Not whipped cream, regular cream.  Yum.

Anyway, one day I was looking for a recipe for pudding that I could make without eggs (Journey is allergic) to use as a pie filling.  I found a recipe for "Chocolate Cornstarch Pudding" in the 1976 version of Joy of Cooking.  This particular recipe called for a double boiler set up and a lot of time.  I didn't want to go to all that trouble, but this was the only egg-free recipe I could find. 

I thought about those packaged mixes.... they don't require a double boiler and the cornstarch is already mixed in.  That's why they're so quick and easy.  I figured I could adapt this recipe to work without a double boiler. 

I first made the chocolate version for the pie, then later came up with a butterscotch recipe.  They're both good, but I like the butterscotch best.  Here are the recipes.

Easy Egg Free Chocolate Pudding

In a medium saucepan, mix together:

3 Tbsp. cocoa
1/2 cup sugar
1/8 teaspoon salt
1-3/4 cups milk
1 Tbsp. butter

In a separate cup/bowl, stir together 1/4 cup milk and 3 Tbsp. cornstarch.  Mix well.  Set aside.

Heat cocoa/milk mixture on medium-high heat, stirring occasionally, till it comes to a boil.  Pour in the milk/cornstarch mixture.  Stir well.  Bring back to a boil, continue to cook and stir for about 1 minute more.  Remove from heat and stir in 1 tsp. vanilla (optional).   Pour into four bowls.  Makes about four 1/2 cup servings.

Easy Egg Free Butterscotch Pudding

In a medium saucepan, mix together:


1/2 cup BROWN sugar
1/8 teaspoon salt
1-3/4 cups milk
1 Tbsp. butter

In a separate cup/bowl, stir together 1/4 cup milk and 3 Tbsp. cornstarch. Mix well. Set aside.

Heat milk/sugar mixture on medium-high heat, stirring occasionally, till it comes to a boil. Pour in the milk/cornstarch mixture. Stir well. Bring back to a boil, continue to cook and stir for about 1 minute more. Remove from heat. Pour into four bowls. Makes about four 1/2 cup servings.

Friday, October 12, 2012

Tunic to Camisole Refashion & Handmade Sweater


Stephanie brought me this tunic from Qatar.  It's a silky fabric, fashioned like a caftan but short for wearing with pants.  It fit when she first gave it to me, but let's just say it must have shrunk in the wash... so it hung in the closet, unworn.

Meanwhile, my sister Kathy sent me a hand knitted sweater that she made.  It's a shrug type sweater in a salmon color. 

I realized that I could refashion the tunic top to work with the new sweater.  It's hard to tell in this pic, but the side seams are actually about 2.5 inches in from the brown border, so I knew there was enough fabric to let it out.  I decided to make it into a camisole. 

I used a camisole view from a sleepwear pattern.  The tunic had a border of brown on all sides including the hem.  I wanted to keep the hem as it was.  I took apart the tunic at the seams and laid out the front and back pattern pieces on the tunic front and back, making sure the bottom of the pattern piece lined up with the finished hem on both pieces.  

It was very simple to sew up this camisole, but when I tried it on, it was huge!  I'd already sewed on the facings by this point, as well as the straps, so I wasn't turning back now.  (Yes, I know I should have tried it on sooner) I stitched in some shirring with elastic thread on the front and back.  That did the trick.  It fits well and is very comfortable.


Sorry for the poor photos, they really don't do justice to the beautiful sweater my sister made, or the really pretty silky fabric of my "new" camisole.

I like this idea of recycling things I own into something new.  Next upcycle project will be a corduroy jumper for Journey from a skirt I haven't worn since, well at least four sizes ago.

Tuesday, October 9, 2012

My DIY Upholstered Headboard


Before we moved we had a sleigh bed, with a headboard and footboard.  This is what it looked like:
(That pic was taken before we put up blinds in the bedroom - those are the paper "construction blinds") I liked the look of the bed but what I didn't like was changing the sheets.  The footboard made it really difficult to make the bed, what with our mattress being so thick and heavy.  I also didn't like the way dust (and cat hair) settled under the bed.  What a pain to dust mop.  The bed was also pretty high so I needed a step stool to get in it.  Which meant one more thing to dust.   I really liked the comforter set but it had to be dry cleaned which was a bummer.  By the time we moved I was ready for a complete change.

I knew I wanted to find a machine washable comforter.  I really want a quilted bedspread, but can't find just the one I want and haven't devoted the time and expense towards making one myself.  I found one that worked with my color scheme at Anna's Linens.  It is machine washable but looks like silk. 

I also knew that I wanted an upholstered headboard.  I found several online that were nice but too expensive.  Target has one that you can slipcover for around $200, but add to that the cost of the slipcover fabric... 

Pinterest has scads of upholstered headboards with links to tutorials.  I studied them all carefully and decided to go for it.

I found a beautiful cut velvet upholstery fabric at JoAnn, which I was able to get for 50% off.  The total cost of the fabric was about $45.  I have just enough fabric left over to make a pillow, so I got just the right amount.  I like the look of brads and various shaped headboards but with this detailed fabric I decided that a fairly plain design would be best.

I won't repeat the tutorial here because you can search google or pinterest and find 29,000 good ones.  In a nutshell, here's what I did.  First I cut brown paper in the size and shape I thought I'd want and taped it to the wall above the bed to get an idea of what I wanted it to look like.  After I knew the exact dimensions, we bought a sheet of 1/2" plywood and Marc cut it to size.  I used a paint can as a template to round the corners. 

Some of the tutorials online said to use foam and batting and some said just batting.  Trying to save a nickel, I just used batting (which I got half off at JoAnn's too).  In retrospect, I wish I'd gone ahead and added the foam, but it's ok without the foam.  I used two layers of batting.  I laid out the batting on the floor, smoothed it out, and laid the plywood down over it, pulled the batting over to the back of the plywood and stapled.  {Sidebar note: we bought an electric staple gun when we were putting the insulation in the last house.  It is worth the $$ many times over for that, and makes various diy project so fast and easy.}  Then I laid the fabric down and made sure it was smooth, and stapled.  I pulled it taught first of course.  When we stood up the headboard I looked at it surprised - surprised that it actually turned out GREAT.  I expected problems.

Next came the issue of how best to hang the thing.  We decided to hang it on the wall cause if we'd put legs on it, it would have been difficult to move the bed.  We used "D" ring type hangers and found the studs in the wall and measured carefully... and it worked!  Again, I expected problems and was surprised when there weren't any.

I have to say that I LOVE the way it turned out.  The total cost, with fabric, etc. was just under $100 and took just a couple of hours.  It was unreal how fast and easy it was.

Tuesday, October 2, 2012

Easy China Cabinet Update


Closeup of Wallpaper Inserts

I have gotten a little bored with my china cabinet because I feel like it's just too much wood.  I really like painted furniture and I thought I might want to paint it.  Not all of it - but maybe just the base, or the back of each section.  My current favorite color is sage green so I was thinking that's what I would do.  But painting is a lot of work and I wasn't sure if the paint would stick without sanding and priming and I knew I was never going to empty it and haul it outside to work on it.  So it just sat there.

Caroline got on a crafty streak and took a country style cabinet and "upcycled" it by removing the doors and painting it.  She mentioned that she wanted to get that fake tin from Home Depot and put that on the back of the shelves but it was too expensive so she bought a roll of embossed wallpaper instead ($20).  When she showed me what she'd purchased I realized I had an almost complete roll of it myself, so she took that to use and returned what she'd bought. 

She also took some of the "oops" paint that I've been stockpiling to paint the wall paper.  Everytime I go into a home store I can't help but look at the marked down paint that they sell for pennies on the dollor and buy it for future projects.  She cut the wallpaper to fit each section, painted it, and then glued it in place after the paint was dry.  I couldn't believe how cute it was and I also couldn't believe I'd never thought of it myself!  I already had all the stuff to do it too.

This method is great cause it's quick, easy, cheap and there's no commitment.  I can literally change out the panels at any time.  I used double sided tape to affix the panels in place.  I will probably get tired of the sage green before long and I'm thinking that I can use red or a beige for Christmas.  I can always save the panels, roll them up to store right in the cabinet, and change them out whenever I want. 

The wallpaper is not actually paper, it's something much sturdier, probably synthetic, which is good cause it will hold up to all the paint without disentigrating.  It's heavily textured, which means that you have to work to get the paint in all the cracks and crevices.  I just cut mine to fit, laid it all out on some brown paper in the garage and started painting.  I had some "oops" paint in a sage green and I used a sponge brush.  It didn't take much time at all to paint and dried very quickly.  I let it dry overnight to be on the safe side then cut some small pieces of double sided tape and affixed them to each corner, then placed the panels in the cabinet. 


Monday, October 1, 2012

Save with the Food Saver

If you've read some of my posts about grinding your own hamburger or other food preservation posts, you know that I buy foods in bulk when on sale.  Well, you've got to do something with all that food.  Freezing is by far the easiest method of storing it on the front end.  Previously I bought so-called "freezer bags" (i.e., Zip-Loc) but found them to be lacking for long term storage.  I had wanted to buy a Food Saver for quite some time but put it off because they're really expensive and I wanted to be sure I got one that had all the features I wanted and for the right price.

After researching various models and brands on the web, I found that the better models have a moist/dry setting which helps when you are packaging wet foods, such as blanched squash or meats.  I also watched some YouTube videos showing how to use it and learned some tips and tricks.

I bought the "Gamesaver Bronze" model.  It was about $169.00.  It has a "camo" design on it which I don't care for, but since I keep it in a cabinet I guess it doesn't matter. It has a fast and regular setting, a moist/dry setting, a separate vacuum/seal setting and a seal only setting. It also has a removeable drip tray, a built in cutter, storage compartment, and a vacuum tube for use with accessories.

I also ordered a jar sealer (sold separately of course) which fits on the top of a mason jar. They have two - one for regular mouth and one for wide mouth mason jars.  The regular is $8.99 and the wide is $9.99.  You attach the tube to the FS, place the jar sealer on a jar on which you've placed a canning jar lid (no ring) and it sucks out all the air.  You don't "can" wet foods in the traditional sense with this method, but it works to extend the freshness of dry foods like nuts, seeds, beans, etc.  You can also vacuum seal refrigerated foods to help preserve them a longer.  Again, it doesn't "can" foods.  But it works so well you have to use a can opener to get it open.  You could also use it to prepare jarred foods for freezing.  Once you sign up on their website you get occasional emails with free shipping, or discounts on bags.  I bought the jar sealer and got free shipping.

The FS website claims that foods keep up to 5x longer. I was skeptical at first, but my research shows that is true. I found this information to be corroborated in the Ball Blue Book and several state college extension websites.

Before buying the FS I was limited to using Zip Loc freezer bags or freezer paper. I can't find freezer paper at the local Wal Mart. I found some recently at a quilt store if you can believe it and paid $4 something for it. If you are only buying and freezing small quantities of foods you probably won't have an issue with freezer burn, but if you buy meat in bulk or raise your own vegetables you will find that Zip Loc bags aren't the answer.  They do let in vapor.  Before buying the FS, twice in one month we pulled some steaks out of the freezer that had been stored in Zip Loc bags which were freezer burned. A couple of episodes like this and the Food Saver will pay for itself.

The very first thing I sealed with the FS was pecans. I always check the mark down section at Kroger when I shop and I found chopped pecans for $1.25 per 6 oz. bag. The regular price was $4.65! The expiration date was many months out. I packaged them in FS bags, three to five bags per FS bag. I pierced the original bag first to make sure all the air came out. I labeled the bags with the expiration date. If I haven't used them by that date I can drop the bags in the freezer for long term storage to be on the safe side.  I bought 20 of the bags and realized I should have bought all of them. I really like pecans, but they're so expensive! This way I have them ready to use. I saved $3.40 per bag, which totals $68 in savings for the 20 bags.  You can see how the Food Saver will pay for itself over time. 

I also learned that I can seal Mylar bags or reseal chip bags (which are usually mylar). I have sealed up wheat and beans in Mylar bags for long term storage, since I have a pretty good supply of wheat in short term storage.  It doesn't vacuum the Mylar (I think because it's too thick), only seals it so you still have to use oxygen absorbers.  To be on the safe side, I add a second seal about 1/2" from the first seal. Mylar bags can be purchased on the internet, but I get them at the Mormon cannery for pennies, so much cheaper than anywhere else. 

To freeze meats or moist vegetables for long term freezer storage it works best if you pre-freeze the foods.  You load up the bags and set them in the freezer till partially or completely frozen.  This way any liquids don't get sucked up  into the sealer.  This is what causes most seal failures.

In the pic below you can see two chicken breasts that I've prefrozen.  I am sealing them in this pic.  Also you can see the bag storage area and cutter. 

The bags can be somewhat expensive, however, they do keep foods 5x longer than a zip loc or freezer paper wrap.  They can be purchased in pint, quart, gallon, "portion-size", or on one long continuous roll which you cut to make your own custom sizes.  This is what I use. Also, they can be reused.  I only reuse the ones that do not contain meats.  I hand wash, air-dry and put them away for future use.  You can boil the foods directly in the bags as well.  They now make a bag that you can microwave in, which would be convenient for corn on the cob or other veggies.

Friday, September 28, 2012

If At First You Don't Succeed - Throw It Away and Start Over!!

Little Journey LOVES dinosaurs.  She knows the names of many of them.  Her favorite:  Brachiosaurus.  She attends a pre-school a couple days a week and they had show and tell featuring items starting with the letter "B".  She has a three foot long blow up Brachiosaurus that she was going to bring.  Coincidentally I made her a little play set with a dinosaur print fabric and an embroidered Brachiosaurus on it which she was able to wear that day.

When I saw this dinosaur print fabric I knew I had to make something out of it for Journey.  I used a turquoise linen blend for the capri pants, which does not require ironing.  I found some cute buttons to match.  You can find these button sets everywhere - JoAnn's, Wal-Mart, etc.  They come in little packets and they also have coordinated sets of buttons.  I have about 10 sets. 

This little outfit seemed simple enough, but once I got into it, it turned out to be more work than I wanted to spend on play clothes.  The sleeves and neck were finished with bias binding and there was a placket and buttons on the back. 

I already had the dinosaur applique design and had used it on something else and knew that it would stitch out nicely.  I used a 4 x 4 size and decided it was too small.  I tried to do the larger size over it but of course it didn't completely cover the 4x4.  Thankfully I had enough fabric to cut another front and start over.  The dinosaur turned out perfect this time.  I was busily sewing along and realized that I had managed to get a fold caught up in the serger knife and had cut into the fabric, front and back, at the top sleeve area.  What to do?  I SHOULD have thrown it out and started over, again, since I did have more print fabric, but I didn't want to go to the trouble of cutting, pressing, fusing stabilizer and interfacing, re-doing the applique, etc.  So I created more trouble for myself in the long run. 

I applied interfacing to the cut area, then fabric glue.  It was still noticeable.  I then decided to create a yoke to cover the cut.  That looked cute.  I added ric rac trim at the bottom of the raw edge of the yoke instead of seaming together the new yoke and the bottom of the top front (this came back to haunt me later).   I added some decorative stitches using embroidery thread. 

Next came the placket.  For whatever reason (operator error??) the placket didn't line up right, which of course I didn't realize until I was completely done and ready for buttonholes.  Oh well, no one would know unless they turn it inside out and examine it closely.


Auditioning Buttons
When I was ready to sew on the decorative buttons to the front yoke I realized in horror that a smidgen of the raw edge of the yoke was visible.  AHHHHHH!!!!  It was too late to throw it away now.  More decorative stitches and I was done.  I told Stephanie to wash it on delicate and use fabric glue if the thing doesn't hold up in the wash.

I absolutely HATE to scrap a project.  I will hold onto it until I get it done, even if it takes years.  I have a couple of not-quite-completed projects on the shelf right now.  My problem is I get so many things in the queue that I'm bored with them by the time I get around to working on them.  One of them - the oldest in the pile -  WILL be a Christmas present if it kills me this year.  Another is a project I was to complete for my sister, almost a  year ago.  She's probably either forgotten it or figures I will never get it done and has bought a replacement.  I need to work on my procrastination issues . . . maybe tomorrow.

This little outfit turned out cute, just don't look too close!!

Thursday, September 27, 2012

My Drop Cloth Dining Room Curtains

I should change my blog name to "My Pinterest Inspired Life".  I absolutely LOVE pinterest.  It's like an on-line free magazine, with pictures and no ads.  I finally broke down and joined so I could keep up with all the pics and links I'm in love with.

If you search Drop Cloth on Pinterest you'll find scads of ideas, including curtains, upholstered headboards, upholstered furniture, pillows, and much more. 

The ceiling height in my dining room is 10 feet and the window is about 8 feet at the top so I needed long curtains.  After pricing the ones I liked, I realized it would cost a fortune to buy curtains/drapes.  I thought about buying fabric using a coupon, but that still would have been expensive, as I would have to buy the curtain fabric as well as a liner.  I found my solution on Pinterest - Drop Cloth Curtains!

I went to Harbor Freight and looked at their drop clothes first, but they were a funky color that I didn't like.  I then went to Lowes and they were perfect!  A light muslin color that works perfectly with my paint color (Sherwin Williams Relaxed Khaki).  They are 100% cotton, come hemmed on all sides, and cost about $10 each.  They're very heavy weight so they didn't need to be lined.  Since they did have a slight industrial (kerosene type) smell, I washed them first, then ironed them while damp.  They do have more than one size, but I got the 6x9, which was perfect for my window.

Marc installed the curtain rod and I used clip rings to attach the curtains.  Instead of hemming the excess length, I simply folded over the excess at the top and clipped it and it was done!  I used a scrap of the kitchen window fabric to make tie backs. 

This was the quickest and possibly cheapest project I think I've ever completed. 

Tuesday, September 25, 2012

Burlap - It's Not for Everyone


I've seen lots of cute burlap projects on Pinterest but the truth is, who wants to recline on a scratchy burlap pillow?? Or eat dinner on a burlap table runner that smells like kerosene??

I made a fitted burlap table cloth for a work table that we used at farmers markets, and it served its purpose and looked homespun, but I certainly wouldn't want it in my house. I've tried washing it, and while that does get rid of the smell, it loses its body and ravels. 

Now that I have a round table all the table runners I made don't really work, so I wanted to make something new. I really like the look of burlap but just can't live with it.  Maybe there's a source of non-stinky, non ravelling burlap I haven't yet found, if so, somebody please let me know before the burlap craze ends so I can get in on it. 

Meanwhile, I found a table runner on Pinterest that had the homespun look that burlap gave, but was made with some other fabric.  It was a simple rectangle with a ruffle at each end. I duplicated this look using Osnaburg fabric, which really works for the home spun feel. I made two runners to cross in the center.  Osnaburg, according to Wikipedia, is "a kind of coarse, heavy linen or cotton used for such items as furnishings and sacks".  I've used it for kitchen towels also.  It's found in the muslin or utility fabric section at JoAnn's.  This picture shows just one runner.  Two seems like too much.  

I made this centerpiece using mostly stuff I already had. The rest of it came from Goodwill. All of the stuff I bought was brand new, still in the package, for a fraction of the price of new. I got a fall garland ($2.99), some fake pumpkins ($2.99), the wrought iron candle holder ($2.99) and the little LED votive candles ($1 each). This centerpiece idea came from YouTube. I wish I could remember the source - she had a lot of really great decorating ideas. In this case she recommended using a tray or platter so that you can easily pick up and move the whole centerpiece if you need the space for meals. I used the turkey platter that Liz made for me and started adding stuff from there.  I started by coiling up the garland to fit the platter, then put the large pumpkin on an inverted bowl covered with a scrap of fabric to raise it up just a little, added the candle holder, LED candles and tucked in pumpkins, large acorns, and extra leaves here and there.

Monday, September 24, 2012

Chevron Pumpkin Play Clothes

Chevron print and Peasant Dresses are "in" right now.  I made a Peasant style tunic top and capri pants for Journey and a pillowcase dress for Willow.  The applique pattern has ric-rac included in the design. While it turned out ok, I haven't included a link and wouldn't recommend this particular design, as it didn't stitch out perfectly.  The one on the left is 6x10 size and the one on the right is 4x4 size. I added the bow after the applique was complete.  

The pattern for the peasant top called for casings with elastic inserted at the neck, sleeves, and waist.  I used elastic thread and shirred the sleeves and waist.  It looks and works so much better for a child.  The casing and elastic just added too much bulk.  Also, the pattern did not call for a "ruffle" at the sleeves and neck.  I used a rolled hem on the serger on the raw edge.  At the neck instead of folding over the seam allowance to form a casing I used bias tape stitched on the fold line.  This left the seam allowance to hem to produce the ruffle, which I really like better. 

Sunday, September 23, 2012

Happy Fall Y'all!


I decorated for Fall a couple of weeks ago.  There was a "cold front" that blew in that inspired me.  It dropped the temps below 100 deg.... While it may officially be fall, it still feels like summer here.

I wanted a fall wreath for my front door and after looking at the prices of ready made wreaths, I decided I could make one for less than the $75 or so price tags I was seeing.  I'd never made a wreath before so I watched some videos on YouTube.  It was ridiculously simple, but it seemed like a daunting task at the outset.  I set up a work table in the garage and was glad I did cause it was pretty messy.

Burlap and Owls are really hot right now, and I think they look cute in my wreath.  The Owl came from Hobby Lobby and was half off.  The "welcome" sign is actually part of the owl.  The burlap ribbon was from Michael's.  It wasn't on sale, but was only $5.99 and I only used part of the roll.  Everything else came from JoAnn's.  The berry picks, acorn picks and sunflowers were about $1.20 each. The grapevine wreath which I used as the base was left over from Willow's newborn photo session, so there was no cost there.

I started by attaching the burlap ribbon.  I used florists wire to attach it to the grapevine wreath, creating "poufs".  Next came the owl.  Then I started adding in the picks here and there, using hot glue, and then the sunflowers.  Finally I added a burlap bow. 


Thursday, September 20, 2012

Willow's Coming Home Daygown and Bonnet


Willow Gray

Here's sweet little Willow getting ready to come home from the hospital.  She looks like a little china doll.  She's wearing a daygown and bonnet made by Grandma.  In my usual form, I waited till the last minute (I put the "PRO" in procrastination) to make this outfit, so there's no hand embroidery. I made a simple white receiving blanket but it got left at home.

I used Jeannie's daygown pattern "Priscilla's Layette".  It's a very easy pattern and quick to sew, due to the raglan sleeves.  The one thing that does take time of course is gathering and hand sewing on all that lace. It's no secret that I am not too fond of hand sewing.  I didn't follow a pattern to make the bonnet.  It is lined with flannel.  I used lace insertion and beading, along with white satin ribbons and some (machine) featherstitching on the bonnet.

For the slip, which is white, I embroidered a flower and ribbon wreath (free embroidery pattern from Martha Pullen's website) in white with Willow's monogram in a delicate font in pink in the center. 

The fabric and laces were given to me by Dana.  While some people wouldn't think of blue for a newborn baby girl, blue is my favorite color and since Journey had a pink dress, Willow needed something completely different.