Showing posts with label Sewing. Show all posts

Friday, December 2, 2016

Christening Gown for Baby Boy

I sell Christening Gowns on Etsy and my "niche" is that I create them from the mother's (or grandmother's) wedding gown.  I like this because it is a special way to use an expensive gown that will almost certainly not be used as a wedding gown in the future.  Also, it helps that each gown is unique so then each project is unique.  Keeps me from getting bored I guess.

Note in the picture it looks like the tucks on the bodice are uneven,
but rest assured they are all perfectly spaced and even!!

One lady wrote and asked me if I would make an ensemble for her soon-to-be-born son.  The thing was, she didn't want to use her wedding gown.  I told her, that's what I do.  No, she wanted newly purchased fabric and lace.  To further complicate matters, she was in Australia. Australia.

I tried to talk her out of it.  I said surely there's someone in all of Australia that can make it for you? She said no, in fact, there wasn't.  I told her it would be prohibitively expensive, as would the shipping (customs and all).  She didn't care.  

So, then we had to decide on fabrics.  Most people who don't sew haven't a clue as to what types of fabrics are available, what's suitable for a particular purpose, or where to buy them.  But she had an idea of what she wanted and I found it for her.  Of course, all of this was done via conversations on Etsy (on Etsy they're called "convos") so it was a bit cumbersome and took some time.  

The fabric is a beautiful sateen in a soft ecru color.  I had used the same brand of sateen to make a dress for Journey and it turned out beautiful.  Funny how using really good fabric makes a project easier to sew.

She also wanted a particular type of lace.  I sent her scads of links to online heirloom lace sellers but in the end she selected something much, much cheaper.  She had this "look" in mind and wasn't hung up on whether it was heirloom quality or not.  


She wanted lace, but no ruffles or gathers.  Lots and lots of tucks.  She was very specific about the design, including how the lace trim was to be inset in the waist seam.


She had this idea of what she wanted and it turned out just as she had envisioned it.  


Wednesday, November 30, 2016

Sweatshirt to Jacket Transformation for a "Tween"

Here's yet another sweatshirt to jacket project.  I bought this sweatshirt from Nancy's Notions, along with several others, on sale.  I used the quick fitting method on this very fast jacket project.

Source
When I went to the Quilt Festival in Houston a few years ago I bought some Fusible Stay Tape (pictured above) from Londa's Creative Threads booth, as well as some of her books.  This Fusible Stay Tape is so easy to use - it is narrow (unlike others I found) and stabilizes the knit fabric by simply fusing it (fusible on one side only) so no stay-stitching is required.  There are two types: "Knit" and "Straight".  I use the "knit" tape on necklines or curved areas.  I use the "straight"  tape on front openings (after cutting open).  Before I found this product I "tried" to stabilize with fusibles, but couldn't find anything narrow enough.  There is a LOT in each package.  I still haven't used it all yet.

Since this jacket was for a "tween" I used sweet and fun flower appliques from BunnyCup Embroidery.  It was free! It stitched out very nicely and I resized it with no problems.  It's amazing how many free designs are out there.

The brown print was a small amount  bought years ago to "audition" for baby bedding.  It was ultimately not used for that purpose and I've since used just about all of it up.  I had just enough for this project.  I didn't have quite enough for true bias tape, so I had to make due with simple foldover.  If you look closely at the neckline you can see that bias would have been better, but... I used the same fabric as a ruffle at the sleeve.

Closure detail
In this close-up of the closure you can see that I used a black hair elastic and two covered buttons.  The one on the left anchors the elastic and the one on the right is the one the elastic goes around to secure. (not sure if that even makes sense, but it's late).  I love covered buttons and they're so easy and cheap to make!

Close-up of the appliqued flowers.


Monday, October 17, 2016

Christening Gown from Grandmother's 1942 Wedding Gown


This a christening outfit I made from a wedding gown originally made and worn in 1942! It was made for my customer's grandmother.  Then her mother wore it (from the pictures - below - looks like it was the early 80's).  It had not been altered to fit her mother.

The gown was machine and hand stitched.  The seams were pinked inside - not something you see often. The fabric was silk satin and absolutely beautiful.  It was cream, but in certain light, looked almost buttery.  It hadn't been stored well after the last wearing and had some rust spots (from the hooks and eyes).  But since it had a train there was plenty of fabric to work with.  My customer had no children but her sister was having one soon and she thought she should do something with the gown before it deteriorated.  Her mother had passed away so it was even more special.

Grandmother in gown 1942

Mother wearing gown at her wedding
My customer wanted the finished christening gown to be unisex.  She also wanted her grandparents' and parent's' names and wedding dates embroidered on the slip.


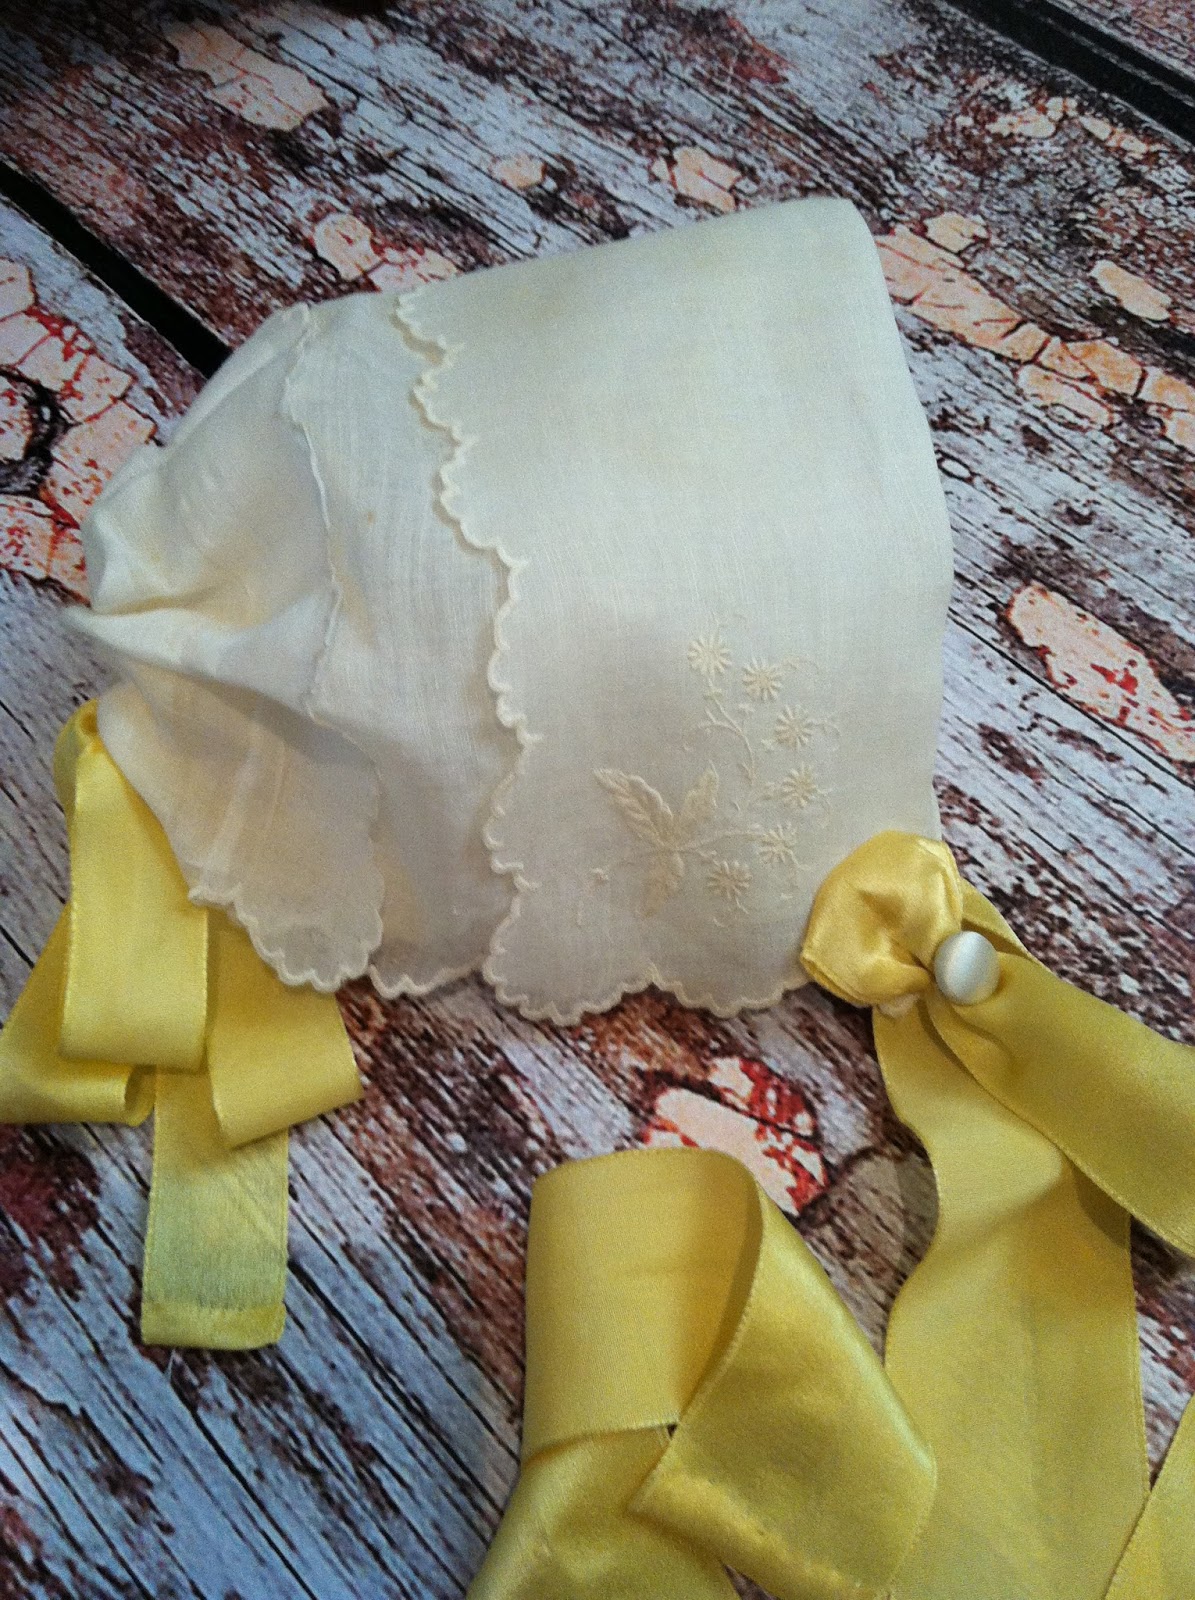
I usually make a bonnet out of the fabric; however, in this case, there was a hand-embroidered handkerchief carried by both the grandmother and mother at their weddings so I made a "Handkerchief Bonnet" and used the silk ribbon carried by both.  Yellow is not usually a color associated with a christening gown, but since it was a special memento of both weddings and the outfit was to be unisex, it worked well.


It always takes me aback when someone sends their cherished wedding gown to me - a total stranger - and asks me to cut it into pieces and create a new family heirloom.  Each and every one has a story to tell and this one in particular was very special.

Wednesday, April 24, 2013

Hearts and Flowers Sweatshirt Jacket Transformation


This jacket was a lot more involved than the past couple of projects I have posted on.  I used the method whereby you cut off the sleeves, then cut out an actual sleeve pattern piece and sew it all back together.  The fit is much better using this method. 

If you wonder why even start with a sweatshirt, why not buy fabric?  Buying a sweatshirt is usually cheaper than hunting down the fabric if you can even find the color fabric you want.  Plus you get the color-mtched ribbings to use on your project or save for another use (for kids' projects for example). 

I didn't have a pattern for the jacket, but I did find some on the internet to use as inspiration. 

I have a machine embroidery design set which I used for the heart/flower applique called "Best Friends Forever" by Friend Folks.  It was pricey - $39.99 - by far the most expensive machine embroidery design set I've bought.  I knew that I wanted to use it for this jacket project the minute I saw it.  I also have in mind that I will make a quilt.  There are 9 different designs.  The only thing I don't like is that there's only one size - 6x10, so you can't size it smaller for kids outfits for instance.  Oh, one other thing, the pictures show quilting but the design disk does NOT include the quilting stitches, which I find to be a little deceptive.  The quilt pattern and instructions are included on the disk.  Even without the quilting stitches, I love the way they turned out. I had some buttons which I used as the flower centers.  The designer sells matching buttons, but I just didn't want to spend any more money.

This jacket morphed as I went along.  Since I didn't have a pattern I kept thinking of things I wanted to add.  I decided I wanted a collar, and ruffled edges, and so on.  I didn't have a pattern for the collor.  I just drew one freehand using the sweatshirt neck as my guide.  I used minky for the collar and cuffs.  The collar is lined in pink cotton and the cuffs are lined in minky.  I got hung up on the sleeve cuffs and tore them out and changed my mind a couple of times before I finally ended up with the plain cuff.

Monday, April 22, 2013

Sweatshirt to Vest Transformation in Aqua, Grey and Red


Here's another Sweatshirt Transformation project I made at Christmas.  For this one, in the interest of time, I decided to make a vest.  I had bought a jellly roll in taupe, grey, aqua, red and green at the Quilt Festival.  It's called Blitzen by Moda.  (I hoarded that jelly roll but couldn't bring myself to open it up for a long time.) 
I wanted a plain grey sweatshirt as the base, which I didn't have on hand (pink, brown, slate blue, etc etc. I have, but plain grey, no) so I went to wally world for a cheapie.  I found an aqua one, which turned out to be perfect for this project!  I think I paid $5 for it.  I prewashed and dried it, cut off the ribbing and sleeves,  then ironed on stabilizer tapes on the cut edges.  I tried it on inside out and marked and trimmed the arm openings till they looked like what I wanted.   I then cut open the side seams.

I started applying the jelly roll strips in the center back.  I just stitched it down.  Then I added a strip on each side till I had the back covered.  I did the same on the front, starting in the center front. I did 'audition' the strips and had an idea of where I wanted each to go before stitching.  After the strips were stitched on, I stitched up the side seams and serged.  I  made foldover trim for the neck and arm openings out of one strip so they would all match.  No, I didn't make bias strips - I only had jelly roll strips to work with, no yardage and anyway, I'm pretty lazy so even if I had the yardage I wouldn't have made bias tape.  For the bottom edge, I combined a few strips of a similar color to make a long enough piece.  (If anyone wants detailed info on the construction process let me know.)


In the picture above you may note the patch on the back, under the neckline.  The sweatshirt had a label ironed on right there and I didn't want to see "Hanes Size XXXX" so I cut a piece of a strip to fit, turned under the raw edges and used Wonder Under or Heat N Bond to fuse it in place.  Looks a lot better to me.

The bottom edge is shown below.  I used a stitch in the ditch method to finish off the foldover trim.  On the left side you can see the inside of the sweatshirt.  I used a matching thread in the bobbin and a taupe in the needle.


Saturday, April 20, 2013

Sweatshirt to Jacket Transformation in Slate Blue and Grey


For some reason I am enamored with transforming a sweatshirt to a jacket.  I have no idea why.  In the hot Texas climate I don't even get to wear them much.  Nancy's Notions had a sale a while back on sweatshirts so I bought several, which have been languishing in the fabric stash closet.  I hoard fabrics and supplies until a project worthy of their use comes along (silly to say that about a sweatshirt I know).

We had a trip planned to Arkansas the day after Christmas and I knew the weather would be really cold (in fact it snowed and we drove through an ice storm) so I thought it would be the perfect time to make some sweatshirt jackets.  The one pictured here is so fast to make I literally made it on Christmas Day, after we celebrated Christmas and before I had to pack for our trip.

In a nutshell, when making a quick sweatshirt jacket, you pre-wash everything and dry first of all.  Then cut off all ribbing, apply two strips of iron on stabilizer to center front and neck edge, cut open the front and try on, inside out.  I then pink under the arm to take up the excess fabric so that it fits better.  This is the easiest way to convert a sweatshirt into a jacket.  The other way involves cutting off the sleeves and reconstructing it, which is more work but it fits better.

After the jacket fits, apply the fashion fabrics.  It's basically a quilt as you go method.  I started with the lighter strip at the bottom of the jacket and stitched it directly to the sweatshirt, on the top and bottom of the strip.  I then took the dark grey strip, turned under the raw edges and pressed and then opened out one edge and pinned it, right sides together, over the raw edge of the bottom strip, and then stitched in the crease.  I finished off the top edge with a blanket stitch.  (If anyone wants more detailed info on construction let me know.)

To encase the raw edges I made double fold strips out of another fabric.  I know I SHOULD have made bias, but I was in a big hurry.  The only place this is really an issue is the neckline but for a quick project I just didn't want to invest the time.  I bound the neck edge and sleeve edges first, then the bottom edge, and finally the front.  I had a cool oversize wooden button that I wanted to use and for the button loop I used a brown hair elastic.  I have gotten so many comments on this jacket and the funny thing is it cost about $15 and took about 2 hours!  It works great to layer over a turtleneck but isn't so bulky that I can't wear a coat over it as well. 

Thursday, April 18, 2013

Sewing for Me - Nightgowns

There was a time when home sewing was much cheaper than buying store-bought clothes, but with the prices of fabric these days and so many mass produced clothing items from China available, that's not always the case any more.  So I plan my fabric and pattern shopping when patterns are 99 cents each and fabric is on sale or I have a coupon.  I can sometimes find fabric at yard sales also.


I went to a yard sale of a former crafter, a lady who had a small home based business, and she had TONS of fabric, among other things, for sale.  It was in huge boxes, all mixed together.  She wanted to sell it all in lots so I had to take what was in the box.  One fabric in the mix was a lacey knit in a hot pink print.  I couldn't imagine that I would ever find a use for it, but eventually I realized it would be perfect for a nightgown.  I had some hot pink stretch lace that I'd ordered off the internet for another project which matched perfectly.

At another yard sale I found some batik fabrics which were about $2 per yard.  She had quite a bit for sale but wouldn't bargain on it so I only got two pieces of about 2 yards each cause I really didn't want to pay that much.  I made a top out of one piece (I'll show it in a later post) and used the other for a comfortable nightgown.  I washed the batik and machine dried it so that I wouldn't have to worry about shrinkage later.

I used McCalls 5248 for both of the nightgowns pictured. The pattern calls for lace trim at bodice top so I followed the pattern directions for the pink one. When I was done and tried it on I realized it was too big (gapped in the back but ok everywhere else) so I made a casing and added a piece of 1/4" elastic to the back, which took care of that issue. 

For the batik nightgown, I didn't have any matching lace so I made a bias tape and enclosed the raw edge of the bodice front with it and used it for the straps.  I like the way the stretch lace on the pink nightgown 'gives' for the straps much better than the straps made from the fabric.  I already knew this batik nightgown would be too big in the back but decided to add rows of shirring instead of the elastic.  Because this nightgown is cut on the bias you're supposed to hang it up to set the bias and hem it the next day, but after serging the bottom edge I just didn't feel like it was necessary to hem it. 

Finished edges - stretch lace and bias tape


Back finish

Monday, April 15, 2013

New Handbags


Turquoise Faux Tooled Leather

Brown/Ecru Tweed
Brown Boucle with Leopard Cross Applique

I have been on a purse making tangent lately.  Here are a few that I have made and listed for sale on Etsy. 

When I go to the fabric store I always look in the remnant bin and it seems like I always find something that would work well for a purse so I pick it up for pennies on the dollar.  Now if only I could sell some to help fund my fabric and pattern buying addiction . . .

Saturday, December 1, 2012

My Charm Square Twirly Skirt Pattern - Coming Soon!

Journey in her Charm Square Twirly Skirt

I do love Charm Squares!  I like the fact that I don't have to measure, cut or coordinate prints/colors.  I like the fact that I can get one or more cuts of each fabric in a collection without having to hunt it down, buy it separately and cut it myself.  Charm Squares are the perfect size for so many things, like table runners.  They go together so quickly.  I made a cute table runner for Liz last Christmas out of charm squares, with red sashing in between the rows of squares.  It was super fast and easy.  One pack had enough squares for two large or four small (like the one I made for Liz) table runners.

I found an adorable collection of Charm Squares called Wee Woodland by Moda that features cute woodland animals, flowers and alphabets in contemporary fall colors.  I bought two sets for about $9 each.  I knew I would make Journey something for fall out of them when I first saw them. 

In addition to being in love with Charm Squares I am in love with Patchwork.  [Throwback to the 70's perhaps??  No doubt.]  Last Easter I made a peasant style dress for Journey that had a patchwork skirt.  I had to hunt for the fabrics that coordinated, and cut, piece, etc.  A lot of work!  Charm Squares, while a little on the expensive side, are the answer.

For a fall outfit I knew I wanted to make a "twirly" skirt out of this Woodland collection.  I searched the world wide web but could not find a twirly skirt pattern that utilized charm squares.  What to do?  Create it myself.  I figured if I wanted such a pattern, there was bound to be someone else out there who also wanted it, so I created a pattern for it.


My Charm Square Twirly Skirt Pattern is a tiered skirt utilizing precut charm squares which are pieced together.  In addition to the skirt pattern I am including a pattern and instructions for creating a coordinating "bib" embellishment on a purchased t-shirt. 

I will have the pattern ready after Christmas.  Now, who is interested in testing it out for me??

Twirl Journey!


Friday, November 9, 2012

Tips for Embroidering or Appliqueing on Knit T-Shirts


Finished T-Shirt
One of the best sites for general embroidery designs and tutorials on how to do just about everything there is to do on an embroidery machine is emblibrary.com.  I've done a lot of embroidery and applique on t-shirts, which can be tricky, but still make mistakes and need to go back to the basics.  Most of the time any problems I encounter are due to operator error. 

I always make sure to prewash and dry the t-shirt and any applique fabrics and then press.  Never use fabric softener because this can interfere with some fusibles. 

Selection of stabilizer is very important.  I like Floriani no-show mesh stabilizer for t-shirts.  It is fusible which I really like.  It's a cut-away type so whatever you don't trim away stays in place.  This is important because it will continue to stabilize the fabric/applique during wear and laundering.  After I fuse on that stabilizer, I add either a fusible tear away or I'll use a wash-away sticky stabilizer.  I choose the fusible tear away if the shirt is a larger size or if I'm only stitching on a portion of a shirt (in a smaller hoop).  If I'm working on a onesie or small t-shirt I use the sticky stabilizer, press the shirt in place and pin outside of the stitching area.  It's just too hard to try to hoop a small item. 

I also use wash-away film type stabilizer as a topper when satin stitching (not during the applique process).

Some of the stabilizers I use
After I launder the applique fabrics, I press well and then apply a fusible webbing.  I like Heat N Bond Lite.  It fuses well but does not gunk up the needle.  Steam-a-Seam  - even their "lite" products - will gunk up the needle - it does not work for me at all.  It's great for fusing things but don't use it in machine embroidery! Take my word for it.  Some designs have so much stitching that a fusible webbing may not be necessary but I think it's a good idea to use this in children's clothing.

Heat N Bond Lite
After pressing the t-shirt I mark the placement of the design with a wash away marker.  I find the center of the neckline and mark to the bottom of the shirt and make another line from one underarm seam to the other.  Then I hoop the shirt, making sure it's all lined up.


My large embroidery hoop is a little on the loose side, which is one of the reasons I use two layers of stabilizer (the mesh and the tear away).  I also like to use a screwdriver to tighten it up after hand tightening.  Maybe one day I'll splurge and get a Snap Hoop and elminate all this work. 


For a large t-shirt, I pull the back up and over the top of the hoop.  There's really no easy way to pin the excess fabric out of the way during stitching, so I just move it around as I go.  I could use sticky stabilizer on the larger t-shirts, but the shirt will be more stable if it's hooped.


 This picture shows a portion of the applique, just after it's been tacked down. 


After this tack down, I remove the hoop from the machine and cut away the excess fabric.  This is where the fusible webbing comes in. I use my Clover mini-iron to set the fusible webbing in place. By doing it at this step I avoid over-pressing the satin stitches.

In order to press in the hoop I made a pressing pad that fits the stitch area of my largest hoop.  I used ironing board fabric (teflon coated I think) on the pressing side and a quilting fabric on the other side.  In between is Insul-Brite fleece.  It's basically like a large potholder.  I added a coordinating ribbon tab so that I can hang the pad near my machine.  I can slip the pad under the hoop while it's still on the machine and press.  This saves a lot of time.


Tuesday, November 6, 2012

Fall Themed Monogrammed Kitchen Towel

I had this really cute applique design from Applique Planet, (which primarily sells applique designs geared towards children) and after making a t-shirt for Rylan with this same design I decided I needed one for my kitchen.  Their appliques are really detailed and stitch out perfectly.  I especially love the heavy top stitching on top of the satin stitch. 

Due to the extra applique fabric, embroidery thread and stabilizers, the embroidered side of the towel is heavier than the other, which can cause it to slip off of towel racks, which is extremely annoying in the kitchen.  To prevent this, I now add weight to the other side of the towel by adding a little extra fabric or interfacing to the band at the lower edge.  It's tucked into the wrong side of the band so it doesn't show but it serves to balance out the weight.

These pictures were taken after I'd used the towel and washed and dried it.  I didn't use fusible webbing on the applique fabric and even though I prewashed all fabrics, you can see that it still puckered a little after laundering.

Friday, October 12, 2012

Tunic to Camisole Refashion & Handmade Sweater


Stephanie brought me this tunic from Qatar.  It's a silky fabric, fashioned like a caftan but short for wearing with pants.  It fit when she first gave it to me, but let's just say it must have shrunk in the wash... so it hung in the closet, unworn.

Meanwhile, my sister Kathy sent me a hand knitted sweater that she made.  It's a shrug type sweater in a salmon color. 

I realized that I could refashion the tunic top to work with the new sweater.  It's hard to tell in this pic, but the side seams are actually about 2.5 inches in from the brown border, so I knew there was enough fabric to let it out.  I decided to make it into a camisole. 

I used a camisole view from a sleepwear pattern.  The tunic had a border of brown on all sides including the hem.  I wanted to keep the hem as it was.  I took apart the tunic at the seams and laid out the front and back pattern pieces on the tunic front and back, making sure the bottom of the pattern piece lined up with the finished hem on both pieces.  

It was very simple to sew up this camisole, but when I tried it on, it was huge!  I'd already sewed on the facings by this point, as well as the straps, so I wasn't turning back now.  (Yes, I know I should have tried it on sooner) I stitched in some shirring with elastic thread on the front and back.  That did the trick.  It fits well and is very comfortable.


Sorry for the poor photos, they really don't do justice to the beautiful sweater my sister made, or the really pretty silky fabric of my "new" camisole.

I like this idea of recycling things I own into something new.  Next upcycle project will be a corduroy jumper for Journey from a skirt I haven't worn since, well at least four sizes ago.

Friday, September 28, 2012

If At First You Don't Succeed - Throw It Away and Start Over!!

Little Journey LOVES dinosaurs.  She knows the names of many of them.  Her favorite:  Brachiosaurus.  She attends a pre-school a couple days a week and they had show and tell featuring items starting with the letter "B".  She has a three foot long blow up Brachiosaurus that she was going to bring.  Coincidentally I made her a little play set with a dinosaur print fabric and an embroidered Brachiosaurus on it which she was able to wear that day.

When I saw this dinosaur print fabric I knew I had to make something out of it for Journey.  I used a turquoise linen blend for the capri pants, which does not require ironing.  I found some cute buttons to match.  You can find these button sets everywhere - JoAnn's, Wal-Mart, etc.  They come in little packets and they also have coordinated sets of buttons.  I have about 10 sets. 

This little outfit seemed simple enough, but once I got into it, it turned out to be more work than I wanted to spend on play clothes.  The sleeves and neck were finished with bias binding and there was a placket and buttons on the back. 

I already had the dinosaur applique design and had used it on something else and knew that it would stitch out nicely.  I used a 4 x 4 size and decided it was too small.  I tried to do the larger size over it but of course it didn't completely cover the 4x4.  Thankfully I had enough fabric to cut another front and start over.  The dinosaur turned out perfect this time.  I was busily sewing along and realized that I had managed to get a fold caught up in the serger knife and had cut into the fabric, front and back, at the top sleeve area.  What to do?  I SHOULD have thrown it out and started over, again, since I did have more print fabric, but I didn't want to go to the trouble of cutting, pressing, fusing stabilizer and interfacing, re-doing the applique, etc.  So I created more trouble for myself in the long run. 

I applied interfacing to the cut area, then fabric glue.  It was still noticeable.  I then decided to create a yoke to cover the cut.  That looked cute.  I added ric rac trim at the bottom of the raw edge of the yoke instead of seaming together the new yoke and the bottom of the top front (this came back to haunt me later).   I added some decorative stitches using embroidery thread. 

Next came the placket.  For whatever reason (operator error??) the placket didn't line up right, which of course I didn't realize until I was completely done and ready for buttonholes.  Oh well, no one would know unless they turn it inside out and examine it closely.


Auditioning Buttons
When I was ready to sew on the decorative buttons to the front yoke I realized in horror that a smidgen of the raw edge of the yoke was visible.  AHHHHHH!!!!  It was too late to throw it away now.  More decorative stitches and I was done.  I told Stephanie to wash it on delicate and use fabric glue if the thing doesn't hold up in the wash.

I absolutely HATE to scrap a project.  I will hold onto it until I get it done, even if it takes years.  I have a couple of not-quite-completed projects on the shelf right now.  My problem is I get so many things in the queue that I'm bored with them by the time I get around to working on them.  One of them - the oldest in the pile -  WILL be a Christmas present if it kills me this year.  Another is a project I was to complete for my sister, almost a  year ago.  She's probably either forgotten it or figures I will never get it done and has bought a replacement.  I need to work on my procrastination issues . . . maybe tomorrow.

This little outfit turned out cute, just don't look too close!!