Saturday, December 24, 2011

Journey in her Christmas Dress


{Journey modeling the Christmas dress that Grandma made for her}


Friday, December 23, 2011

The Stockings Were Hung . . .


My Grandma Gray made a felt stocking for me when I was litle. I still have it, but it has a few moth holes, which tells me she made it with wool felt. She also made tree skirts, door knob hangers, and tablecloths, all from felt. She made a table cloth which was essentially red net with appliques out of felt. I think Dana has that. One of these days I would like to copy it. Grandma Gray also made my mother's tree skirt (I'm not sure who has it now) and one for me when Elizabeth was a baby. She appliqued a baby on it and embroidered Elizabeth or Liz, I can't remember now - I gave the tree skirt to Liz.

My mom made Elizabeth's stocking when she was little too. And Liz made one for Rylan. Rylan didn't need another one, but I had some stocking stuffers for her and it's just not the same without a stocking. So before I mailed her Christmas gifts, I made this one with the embroidery machine. I used a water soluble pen and traced the stocking shape on red felt, but didn't cut it out. I had to hoop the felt twice to get all of the snowflakes on this full size stocking. After embroidering, I cut out the stocking shape, front and back. I embroidered the name on white felt, then made the scalloped edge on the sewing machine freehand. I then stitched it all together. It was very fast and easy.

While my mother made Elizabeth's stocking, I bought a knitted stocking for Caroline when she was little and made one for Stephanie using a pre-printed, pre-quilted stocking panel (26 years ago...). Caroline contends that because it's store-bought, she never had a proper stocking. So, about 10 or more years ago, I bought a felt stocking kit to make for her. Looking back, I realize that I must have bought THE most complicated design they had. Every year I think I will get it done and Caroline gives me a hard time when it's not . . . but this year - I finished it!!

Wednesday, December 21, 2011

Homemade Christmas, the Mud Room and Food Storage


{Bay Leaf Wreath}


Last year we had a Homemade Christmas. I had wanted to do it for a long time. Turns out it was a LOT of pressure. In my usual form, I procrastinated till the last minute and then didn't get everything done that I wanted to do. Also, I didn't get pictures of most of the things I made.


Some of the gifts were surprising. Those who thought they couldn't make anything came up with some great gifts. Frank made me a fleece blanket and a Texans cap/coat rack for Marc. Stephanie made Marc monogrammed socks (he goes through socks like crazy) and me a gift basket with home made bath products. Caroline made me a turquoise necklace and Marc a Texans fleece blanket. These are just some of the great gifts that were exchanged.


{View of Mudroom from Kitchen}

When we built the mud room we originally thought we would build cabinets on one wall. We decided against that and so Marc made me a large cabinet to be used as a pantry. It was my Christmas gift from him last year. It's quite large (about 3 feet wide and 7 feet tall and 2 feet deep). I use it for overflow pantry storage (since I don't have a proper pantry) and some small appliances that I don't use very often. I also store home canned items in it. I quickly filled it up, so he made another one for me this Christmas. I knew he was building it but one day I walked thru the mud room to do some laundry and when I came out I was shocked to see that he had moved the extra refrigerator out to the shed and moved the cabinet in. I had totally missed it as I walked past it several times.


{Mudroom}


{2010 Cabinet}


I've got wheat and my Excalibur wheat grinder in this cabinet, as well as some small appliances like the bread machine and crock pots, sugar, home canned foods, etc.


{2011 Cabinet}
In the new cabinet, Marc built the shelves a little closer together so I can get more smaller items stored. The very top shelf is lower on the front and higher in the back and has a lip on the front, so that I can put cans on it and they will roll forward. I have 4 cases of canned goods on this shelf already and there's room for more. I have rice, oats, beans, and more stored in this cabinet. I organized everything and took an inventory of what I had in there. I was surprised to see just how much I had stored, but there's still room for more. I've been shopping sales and stockpiling sale items and it adds up pretty quickly. After Christmas I'll do a post about home food storage or "stockpiling".


Marc even went in my craft room and found some Christmas stamps and even hand made gift cards:

Tuesday, December 20, 2011

Another Quilt As You Go Table Runner


I'm officially in love with making Quilt As You Go table runners. They are SO fast and easy. I bought a Charm Pack from Nancy's Notions sometime this year when it was on clearance, for like $2.50. It's by Deb Strain for Moda, but that's all I can remember. Anyway, the colors and designs are so modern. I originally thought I would use this to make a patchwork dress/jumper for Journey for Christmas, but after tearing up the attic looking for that pattern (I'd saved it from a Woman's Day magazine from the early 80's), I abandoned that idea. Maybe next year for that project.


I arranged the squares the way I wanted them and then sewed three together to make a strip. I then cut the red broadcloth into strips two inches wide for the sashing. I layered quilt batting over the backing fabric and used temporary spray adhesive (which I use in machine embroidery quite often) to hold them in place. Since this is a short runner (36") I started at one end with a red sashing strip. I stitched as described in my previous post about QAYG table runners. Pressed for time (surprised?) I serged the edges then stitched jumbo red ric rac to the edges. We use this ric rac all the time in making dresses for little girls for sale. We buy it at Hobby Lobby when it's half price. Each roll holds about 9 yards or maybe it's 9 feet, anyway, it's about $2 per roll and comes in a lot of fun colors. The first time I used it I washed and dried it to ensure that it was colorfast - it is.


The charm pack made TWO table runners this size. Plus there were a few charms that were left over that I didn't want to incorporate into this project. I used those on Rylan's scarf and Journey's Christmas dress.

Monday, December 19, 2011

Naughty or Nice


Here are some pics of the Christmas outfit I made for Journey. I started with McCall's 6062 pattern. It's a peasant style dress. It was very fast and easy to make. I made a few changes from the pattern's instructions. The pattern called for an underskirt and an overskirt. It was a huge waste of fabric and didn't add anything to the overall look, so I omitted the overskirt and added an apron. I wanted it to look like the PortobelloPixie Claire peasant dress. I had used that pattern last year to make Christmas dresses for sale. We made the apron tie style, but found (after making MANY dresses) that the pattern didn't fit as expected, so I didn't want any surprises this year, which is why I used the McCalls pattern. The PP pattern is so cute and features a full color instruction booklet which I liked, but the end result was disappointing. Also it was very expensive!! I used the PP apron pattern piece for this one. I ended up cutting it down just a little. I embroidered the apron first, then added a lining and bound the edges. The tie around the waist is part of the McCalls pattern. I cut the ruffle using the pattern but I cut an extra piece and used the ruffler to make the ruffle. Gone are the days when I will sit and gather fabric. It's amazing what a $20-$30 attachment can do to automatic your sewing.

Since this is a winter dress, I wanted long sleeves, which the pattern didn't include so I converted the sleeve to 3/4 length. Another change I made was adding ribbon instead of elastic at the neck and sleeves. This way, we can customize the fit for Journey this year, and will allow her to wear it again next year.

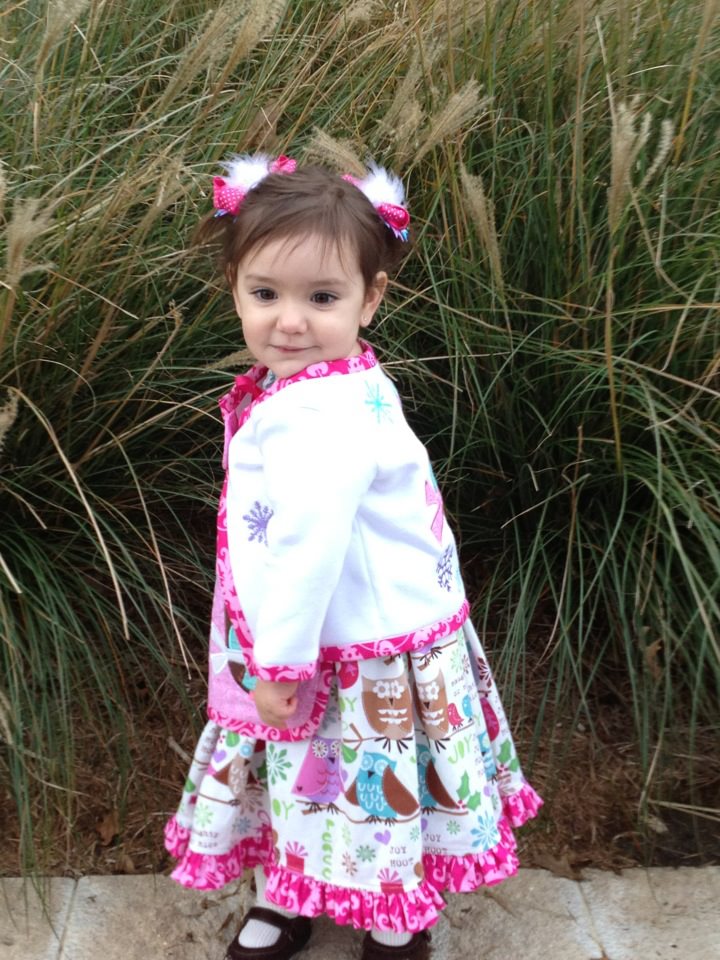
Here's the back view:


I used some of the motifs from the skirt fabric to embroider the jacket and apron. This is the same owl I used to make Rylan's scarf, shown in a previous post, just different fabrics. It's featured in this month's Designs in Machine Embroidery magazine I noticed. It's from Planet Applique and SO cute. They have really cute kid's applique designs.


This fabric at first glance doesn't look "Christmasy" at all. But if you look close there's a stocking, present, snowflakes, etc.

We have professional labels that we add to garments that we sell, but I like to add a "Grandma" label and a size label to gifts too.


The jacket is a project that I've been wanting to try for over a year. The concept is basically taking a sweatshirt and refashioning it into a cardigan. I have searched high and low for a sweatshirt in a toddler size that didn't already have designs on it and couldn't find one. I finally found a fleece shirt that I could use. To make this you start by cutting off the collar and cuff ribbing, cut up the center of the front, and stabilize all edges with iron on interfacing. From there it's all design fun. I embroidered motifs that matched the skirt fabric and apron on the front and back, then made about ten miles of bias binding which took longer than anything else.

My friend Beth loaned me a book by Mary Mulari and Nancy Zieman called "Sweatshirt Makeovers for Kids" which contains some techniques and ideas. The closure idea came from her book, although I altered it just a little. It's a little flap that uses hook and loop tape (which I have in pink of course).


When I got my sewing machine I bought every accessory they made for it, some of which I still haven't used yet. I have a bias binding foot but it says it's for commercial binding, so I didn't try it out on this project. Commercial binding has one side that slightly wider than the other. Obviously my home made binding is not perfectly straight much less wider on one side... I also bought a "Ditch Quilting Foot" which I'd never used before, so I thought I would try it out. I am wondering how I ever lived without it. It made 'stitching in the ditch' incredibly easy and SO precise. Here's a closeup of the foot in action:


It has a blade that skims along in the "ditch" keeping the stitching lined up perfectly.


Nancy's Notions had a sale on sweatshirts so I bought about 6 of them to make cardigans for myself. These are nothing like Wal-Mart shirts - the fit is perfect and they are preshrunk. Stay tuned for more sweatshirt transformations.

Wednesday, December 14, 2011

Christmas Table Runner for Stephanie


My Quilt As You Go Table Runner


Stephanie's kitchen is green and pink so I made a table runner that would match her colors. Her Christmas tree is white, covered with pink and silver balls and other decorations.


After my Fall Table Runner, which turned into a long drawn out project, I wanted something fast and easy. If I'd had a "jellyroll" it would have been even faster, but I used scraps of fabrics left over from dresses that we sold. I cut the strips about 16 inches by 2-1/2 inches with a rotary cutter. I wanted the finished runner about 15 by 60, so I cut a piece of batting a little bigger than that, as well as the backing fabric (I used plain white, cause I had a lot of it already). I should have used temporary spray adhesive to hold the batting to the backing fabric, but I forgot till I was about half way through the whole project. I just used pins and it worked fine.


I started by placing one strip approximately in the center of the runner, right side up, and sewed it down to the batting and backing, using a 1/4" seam. Then I laid the next strip on top of that first strip, right sides together, and stitched over the first seam. I then turned the 2nd strip over and pressed the seam flat (being careful not to melt the batting!). I kept adding strips in this manner until I got to one end. Then I started doing the other end by placing a strip over that very first strip, and working toward the opposite end. You basically work from the center of the runner to the ends. It was so fast and easy. Then I had to "true up" the edges using the rotary cutter. I serged the edges just to make it easier to deal with in the binding process.


Next I embroidered snowflakes on each end. I had bought some iridescent and metallic threads during JoAnn Fabric's after Thanksgiving Doorbuster Sale and tried them out. I slowed the machine speed down, used a metallic needle and still had the thread break a few times. [Sidebar: I had lots of problems with the next couple of projects I did after the snowflakes - thread shredding, "nests" and so on. After researching the problems, I realized it was operator error (always is). I have a habit of impatiently pulling the thread cone off when I'm changing threads, and pulling the thread tail back through the needle and tension mechanism when I should snip the thread and pull the extra piece of thread thru the needle. I happened to see a glimmer of that iridescent thread in the "works" and once I got it out I didn't have any more problems. I guess it does really pay to read and follow the directions.]


After the thread issues, I was anxious to get done with the table runner quickly. I had already made bias binding out of the green stripe fabric, but at the last minute decided to use lime green jumbo ric rac to finish off the edges. It was super fast and looked really cute.


I have a couple more runners cut and ready to sew. I'll post pics of those when (if?) I finish them.

Tuesday, December 13, 2011

Fun With Fleece


Since there are only twelve days till Christmas I thought I would title this post "The Twelve Days of Christmas" and do a post every day until Christmas, but then I realized that was too much pressure . . .


I've had a booklet from Hancock Fabrics that I picked up at a yard sale years ago caled "Fun With Fleece". It has all kinds of projects made out of fleece, with all the instructions, patterns, and tips needed.

I decided to make a hat and scarf for my granddaughter Rylan who lives in a colder climate for Christmas. She plays in the snow and needs to stay warm. She won't wear clothes that Grandma makes, but I figured I might be safe with a hat and scarf.

I first used a pattern for a hat which turned out terrible! It wasn't lined so it wouldn't be very warm, and the brim/band was floppy. It called for lapped seams, which made it look way too home made. I then tried serging, which worked better. But the band was just too limp, even thought I tried doubling the band by using a lining. Trash that one.


That's when I remembered the Fun With Fleece booklet in which I found instructions for making a hat without a pattern. You basically make a tube (aprx. 11" by 17"), sew the short sides and gather the top. I made two tubes - one for the lining and one for the outer fabric. I made the lining a few inches longer (aprx. 14" by 17") than the outside so that it could become the "brim" or hatband or whatever you call it. I decided I wanted about 4 inches of fringe on the top, so I used a rotary cutter and cut the fringe. I then used a piece of the selvedge to tie the top instead of sewing gathers. It turned cute and it was super fast and easy.

The booklet said to cut a scarf 9" wide. Again I used two fabrics, white for the outer fabric and pink with dots for the lining. I cut the scarf the width of the fabric. First I embroidered a winter owl motif on one end and two snowflakes on the other of the white fabric. I then cut off some of the excess fabric on the selvedge ends and made that into fringe, then top stitched the whole thing.

Both projects were fun and easy!

Scenes from the Baby Shower for Cody & Marie

Click to play this Smilebox slideshow
Create your own slideshow - Powered by Smilebox
Create a free photo slideshow