 |
| Finished T-Shirt |
One of the best sites for general embroidery designs and tutorials on how to do just about everything there is to do on an embroidery machine is emblibrary.com. I've done a lot of embroidery and applique on t-shirts, which can be tricky, but still make mistakes and need to go back to the basics. Most of the time any problems I encounter are due to operator error.
I always make sure to prewash and dry the t-shirt and any applique fabrics and then press. Never use fabric softener because this can interfere with some fusibles.
Selection of stabilizer is very important. I like Floriani no-show mesh stabilizer for t-shirts. It is fusible which I really like. It's a cut-away type so whatever you don't trim away stays in place. This is important because it will continue to stabilize the fabric/applique during wear and laundering. After I fuse on that stabilizer, I add either a fusible tear away or I'll use a wash-away sticky stabilizer. I choose the fusible tear away if the shirt is a larger size or if I'm only stitching on a portion of a shirt (in a smaller hoop). If I'm working on a onesie or small t-shirt I use the sticky stabilizer, press the shirt in place and pin outside of the stitching area. It's just too hard to try to hoop a small item.
I also use wash-away film type stabilizer as a topper when satin stitching (not during the applique process).
 |
| Some of the stabilizers I use |
After I launder the applique fabrics, I press well and then apply a fusible webbing. I like Heat N Bond Lite. It fuses well but does not gunk up the needle. Steam-a-Seam - even their "lite" products - will gunk up the needle - it does not work for me at all. It's great for fusing things but don't use it in machine embroidery! Take my word for it. Some designs have so much stitching that a fusible webbing may not be necessary but I think it's a good idea to use this in children's clothing.
 |
| Heat N Bond Lite |
After pressing the t-shirt I mark the placement of the design with a wash away marker. I find the center of the neckline and mark to the bottom of the shirt and make another line from one underarm seam to the other. Then I hoop the shirt, making sure it's all lined up.

My large embroidery hoop is a little on the loose side, which is one of the reasons I use two layers of stabilizer (the mesh and the tear away). I also like to use a screwdriver to tighten it up after hand tightening. Maybe one day I'll splurge and get a Snap Hoop and elminate all this work.
For a large t-shirt, I pull the back up and over the top of the hoop. There's really no easy way to pin the excess fabric out of the way during stitching, so I just move it around as I go. I could use sticky stabilizer on the larger t-shirts, but the shirt will be more stable if it's hooped.
This picture shows a portion of the applique, just after it's been tacked down.
After this tack down, I remove the hoop from the machine and cut away the excess fabric. This is where the fusible webbing comes in. I use my Clover mini-iron to set the fusible webbing in place. By doing it at this step I avoid over-pressing the satin stitches.
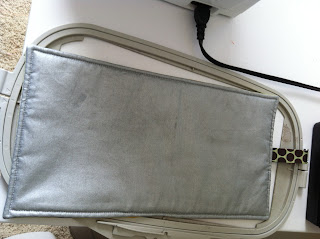
In order to press in the hoop I made a pressing pad that fits the stitch area of my largest hoop. I used ironing board fabric (teflon coated I think) on the pressing side and a quilting fabric on the other side. In between is Insul-Brite fleece. It's basically like a large potholder. I added a coordinating ribbon tab so that I can hang the pad near my machine. I can slip the pad under the hoop while it's still on the machine and press. This saves a lot of time.


Good tips.Thank you for sharing.
ReplyDeleteHow did you figure out how much to move the shirt over for each crayon applique? I'm having trouble with that part. :/
ReplyDelete