Tuesday, February 7, 2017

Cool Estate Sale Find


I found this old tool caddy at an estate sale about 7 years ago.  It came full of nuts and bolts and lots of dirt and this really cool turquoise color.  It sat in a shed all these years because I just couldn't figure out what to do with it.  It has separate compartments that I thought would be perfect to hold mason jars but it's just a bit large for the kitchen table.  

I was trying to find some way to keep pencils, markers, etc., organized but close at hand in my craft room and finally found the perfect use for it!. I can keep it on my work table to keep everything at my fingertips but easily move it under the table if I need to cut out fabric.


Saturday, February 4, 2017

Shaker Gift Card

My First Shaker Card!
I've always had an interest in doing more paper crafts, but just didn't have the room to spread out.  I even bought a Cricut and accessories a few years ago, but never had the room to keep it out and accessible, and therefore I didn't get much use out of it so I finally sold it.

Now that I have moved all my sewing and crafts out to the "Little House", I have room to spread out, which means that I can now work on paper crafting.  

I've been watching some YouTube videos on card making and stumbled upon NurseTara04's videos.  She has a lot of really good tutorials on papercrafting.  I loved the idea of a "shaker card" - where you have sequins, glitter, or other small free-floating items encased behind acetate or other clear medium.

NurseTara04 took this a step further with Shaker Swag Bags.  I used her tutorial to create some gift card holders for Christmas.  I started with a small kraft paper bag and folded and embellished it.  The bag opening is the place where you can add a gift card or other small "swag" items.  

I added sequins, silver disks, pearls and seed beads to the shaker window then embellished the front with silver glitter washi tape and snowflakes. I made an insert to hold cash for this card out of cardstock, washi tape and a large snowflake.  Everything but the paper and acetate came from Dollar Tree.


Wednesday, February 1, 2017

Hand Made Journals


Having a laminator and a binding machine at my disposal has opened up a world of possibilities for paper crafting.  I am making booklets for everything I can think of.


So I thought everyone needed a journal at Christmas.  I started by finding paper for the covers that I thought the recipient would like and laminated them.  I then typed up some bible verses that I like in different fonts and printed them out on 8.5 by 5.5 size paper.  My first thought was that I would use those verses on dividers for sections in the journal.  Maybe 12 sections, one for each month.  I ended up making a couple of journals with 12 tabbed dividers then made others without.  


I'm not much on journal writing myself, so I didn't know how the recipient might use them.  I thought they would perfect for daily journaling, but also thought they would work well for a prayer journal, or jotting down notes when researching bible topics.


I made a bookmark to match each journal and wanted a tassel on each one.  I had to watch YouTube videos to learn how to make tassels..... I bought embroidery floss in colors to coordinate with each journal and made a tassel for each.  Turns out, tassel making is very easy. I took these pics before making the tassels. 


Hard to see in this pic, but I used a stamp and a VersaMark stamp pad for the square embellishments on the cover and bookmark.  This stamp pad creates a translucent watermark or tone-on-tone image instead of color.  


I found the washi tape used in this journal at Target, in the "Dollar Spot".  I wish I had gotten more of it!


I used washi tape to adhere the bible verses on these dividers and tabs before laminating. 


This cover and bookmark are embellished with another Target dollar spot washi tape.  

Saturday, January 28, 2017

Family Recipes and Kitchen Memories

Family Cookbook in the making
I've been wanting to create a family cookbook for years.  I started typing it in 2011 and just finished it in time to give it as a gift this Christmas!!! When I first came up with this idea - many years ago -  I had sent emails to family members asking for recipes but only Dana wanted to participate.  Between the two of us we compiled recipes that we remembered our parents and other family members making, along with memories relating to holiday meals and cooking in general.

When the idea was hatched we thought about how to actually put it together and we thought maybe a three-ring binder would work because we could find them at any store and we'd be able to add recipes in the future.  Between then and the time it was finished, Dana had purchased a brand new, unopened binding machine, along with all the binding combs we could ever use, for about $20 at a teacher supply store sale. 

I knew I wanted a retro, 50's feel to the cookbook, so I used red gingham paper from Hobby Lobby for the front and back cover.  I used white cardstock for the section dividers and the title on the front.  I didn't have a font that I liked on my computer so I searched the internet for a suitable font.  

I'd never downloaded a font before so I didn't know how hard it would be.  Turns out - it was super simple!  I used the Remachine Script  font from DaFont.com.  It was free for personal use.  The download instructions on DaFont was very easy to follow.  Now that font is installed on my computer and can be used for anything.  I used that font for the cover page and all divider pages.

I typed all of the recipes in Microsoft Word.  Once I had them all typed in, I added a Table of Contents.  Once that was done, I could add recipes or move them around and re-build the table of contents.  It was super convenient.

Using the binder is pretty simple.  To punch holes in the sheets  you just center the sheets to be perforated, set the paper stop, and pull down on the handle. 

I made the cookbooks 8.5" by 5.5" (half a letter size sheet of paper).  The covers are a bit larger.  I used black cardstock to make the covers a bit sturdier.  I used glue sticks to adhere the red gingham paper to the cardstock, then I laminated all the covers.  

Since the covers are a bit larger than the paper, I had to reset the paper stop on the binder to punch the holes in the center of each cover.  Then I trimmed the binding combs to match the number of holes in my books and bound them.
Punching Holes

Of course we found some typos once it was printed and assembled, even though I'd previously checked everything.  Oh well, I guess now it will be a simple matter of making new editions in the future.


Monday, January 16, 2017

Soap-On-A-Rope and Other Soapy Stuff in the Canning Kitchen


I have been wanting to make Soap-On-A-Rope for a long time.  I searched online soap making supply companies for the rope parts and found them, but there were super expensive, in my opinion anyway.  So I had to find a more cost effective solution.

I found some nylon cording at Hobby Lobby for about $1.99 or $2.99, can't remember exactly, but I was able to use a 40% coupon.  Anyway, it came in a lot of colors, but I thought basic white was the best choice, because it would go with anything.  Also it was about 2 miles long, so I'll have nylon rope for lots of future projects.

I used my basic bath soap recipe and scented it for men, using leather, sandalwood, and vanilla fragrance oils, and cedar essential oil.  I didn't add any color because the fragrance oils tend to darken the soap batter. 

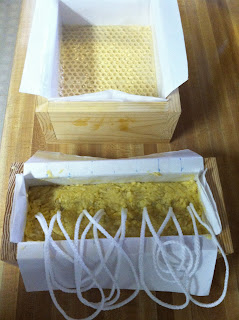
I measured and marked on the liner paper where the bars would be cut so that  would know where to place the ropes.

I cut the ropes into what I thought were good lengths and slightly melted the ends and stuck them together.  I used a knife to push the ropes down into the soap batter.  I made a two pound batch of soap and got 8 bars.

I also made a batch of Goat's Milk, Honey and Oatmeal Soap to give away.  The family members who live further away had never tried my soap so I sent some of this, along with Charcoal, Tea Tree and Lavender Face Soap.

The goat's milk soap is made differently from the first one.  It is what is known as "cold process" as opposed to the soap on a rope recipe, which is "hot process".  Hot process means it is cooked until the oils and lye have saponified and excess water is cooked out.  That type of soap is ready to use right away.  That's the way great-grandma probably did it, in a cast iron kettle over an open fire.

Source

Nowadays, we use a crock pot. 

Cold process soap is mixed and poured into molds right after it reaches "trace" (the point where the saponification process is taking place).  The excess liquid has to evaporate over time - usually 4-6 weeks.  

Goat's milk can cook when it is mixed with the lye, turning it brown, so I freeze the milk and mix it with the lye while frozen.  This eliminates the dark color.  I added local Ozark honey and finely blended organic oatmeal. to this soap.  There is no fragrance or color of any kind in this soap. The honey tends to turn it a more golden color (due to the sugar).   I used only a one pound recipe, which turned out to not be enough to my liking, because the bars turned out thin.  I lined the mold with bubble wrap, top and bottom, to give the soap a honeycomb look after unmolding.


Soap covered with bubble wrap

Below is a pic of my work space.  This is the kitchen in the "Little House".  The only problem with this house is that there is a floor joist that needs to be replaced and some rotted floor boards too and the floor has a "buckle" in it in the kitchen.  Some day I'll get around to fixing it....  but for now it works just fine for all my crafty projects.

Not shown in the pic: Canning jars and equipment are stored in the cabinets and pantry.  We use this kitchen for butchering, so butcher paper, tape, a commercial meat cutter, saws, etc. are located here, as are the four freezers belonging to the kids  (mine is in my house).  There's a wooden work table in the middle of the room.  I cover the top with freezer paper for soap making.  We also have a "plastic" folding table that we use for butchering.  I also have my soap supplies located here.  This is a perfect place to do these types of activities, because I don't have to worry about lye in the house and I can walk out and leave the mess for another day!


Friday, January 13, 2017

Hand Made Bath Tea


One of the home made Christmas presents I made this year was a "bath tea".  The teas can be made of various things, including milk.  The idea is to suspend the tea bag from the faucet while filling the tub, and/or drop one or more tea bags into the tub as it is filling.  My tea is made from botanicals, herbs, and essential oils.  I used dried calendula flowers and lavender buds (purchased from the health food store), dried rose petals, mint and clover blossoms harvested from my yard, and lavender essential oil.  I mixed up the ingredients, sprinkled on the essential oil and stored it in a jar for about a month to let the fragrance soak into all the plant products.

I had purchased the DIY tea bags at the health food store.  I bought them to make home made tea from my mint and clover blossoms.  Quite a few come in the package.  The tea bags come joined together, but perforated for easy separation.  One side is open for filling. They come with a little "tag" and string just like a regular tea bag.

Each tea bag is a regular size tea bag. The larger "family size" tea bags definitely would have been better for this purpose.  But it's what I had on hand...

So I stuffed each bag with as much tea as I could get in it.  I then heat sealed the open end.  I keep a cheap, 1 inch hair straightener in the kitchen for sealing mylar bags and other items.  After using these tea bags, I can see that I could have made my own using interfacing and stitch witchery to seal the edges, at a MUCH cheaper cost. That way I could have made the bags an size I wished.

I don't know how they worked out because I haven't received any feedback from the recipients.  These little tea bags would also be great to put in a drawer as a sachet.