Here’s a quick and easy project you can make for yourself or to give as a gift. Following are the instructions for the two different types that I’ve made.
Method 1 - Using purchased terry towels
I purchased plain white waffle-weave cloth towels in the kitchen department of the local “big box” store. They came in a pack of three for less than $6. Prewash and dry the towels and press. Do the same for the fabric unless you buy quilting cotton, in which case it’s already preshrunk.
Using the width of the purchased towel as a guide, cut a band of fabric the width of the towel plus 1” (the seam allowances will be ½”). Make the band as long or as short as you want, this is just the decorative band which will be at the bottom of your finished towel. This is where you can use scraps left over from other projects. In this case I used a band about 5” long so that I ended up with a 4” strip at the bottom of the towel.

Cut off the hem from the bottom only of the purchased towel.

With the right side of the band to the wrong side of the towel, and raw edges even, stitch or serge using ½” seam allowance.


Press, folding band to the right side of the towel. Then press under your seam allowances on all raw edges of the band – 1/2” on each side of the band and ½” at the top of the band. Press well.

If you want to add any embellishment, such as ric-rac, this is the time to do it. I inserted jumbo ric-rac just under the band so the top of the ric-rac shows after it’s all assembled. You could also add piping or a coordinating strip of fabric. If you’re using any embellishment, stitch it in place before proceeding to stitch the sides. You can also add a decorative stitch here. I used the featherstitch.

Then stitch along each edge of the band using a regular straight stitch to secure the edges of the band to the towel. That’s it!

Finished Towels, to be given as Christmas Gifts!

Method 2 - Creating your towel from fabric
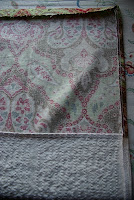
This method is a little more work. You’ll need a fabric that’s 100% cotton for absorbency. I used an interesting heavy fabric that I found at the quilt store for the “towel” part and a pretty green and red paisley for the decorative band.

Decide what size you want to make your towel. The best way to do that is look at some towels you already have and measure them. I wanted mine about 18 x 28 inches, finished size. Be sure to add ½ inch seam allowances to all edges before cutting.
So, I cut the "towel" fabric 19” wide by 25” long and the decorative band fabric 19” wide by 9” long.

With right sides together, having raw edges even, stitch or serge the decorative band to the towel.

Press, pressing seam toward band.

If you have a serger, serge all edges then turn under ½” and press.

Fold the decorative band wrong sides together so that the pressed edge meets the seam on the back of the towel. Press well then “stitch in the ditch” on the right side, catching the pressed edge of the band on the back of the towel.

Finished Towels!

No comments:
Post a Comment